
Tuesday, May 17, 2011
Blah Blah Blogger
I have been trying to post for several weeks now and every time I try to upload pics I get "bad request." I'm hoping to get to the bottom of this soon! I've got several unfinished projects that I am looking forward to sharing soon!
Wednesday, April 20, 2011
Springtime in my Backyard
I love spring in my backyard - roses blooming, fruit trees producing, and getting my garden going. My nectarine tree, I can't believe we're going to get some fruit this year, I thought it would be another year or two since it was a glorified stick when we got it!
 Grapes are blooming as well, I'm hoping this year we'll get a good amount! Last year we got a few stems, but not much.
 One of my favorite roses, such a light blush color, they make my day seeing them bloom.
 Our lavender plant is blooming! I thought I had killed it pretty much when I forgot to water it for a while, but apparently the R&R in one of my garden boxes was the trick! So pretty!
 Holy cow our peach tree! Look at all those peaches! We had to cut the tree back severely last year due to peach curl, so I'm really hoping we get to eat these peaches this year! I wish I bought 5 more of these trees, it has grown so fast!
 One of my white roses from my little rose tree. It amazes me sometimes that things like roses and trees blooming and the beautiful sunsets we get here make me so happy. Nature truly has a therapeutic effect!
 My nectarine tree, I can't believe we're going to get some fruit this year, I thought it would be another year or two since it was a glorified stick when we got it!
 Grapes are blooming as well, I'm hoping this year we'll get a good amount! Last year we got a few stems, but not much.
 One of my favorite roses, such a light blush color, they make my day seeing them bloom.
 Our lavender plant is blooming! I thought I had killed it pretty much when I forgot to water it for a while, but apparently the R&R in one of my garden boxes was the trick! So pretty!
 Holy cow our peach tree! Look at all those peaches! We had to cut the tree back severely last year due to peach curl, so I'm really hoping we get to eat these peaches this year! I wish I bought 5 more of these trees, it has grown so fast!
 One of my white roses from my little rose tree. It amazes me sometimes that things like roses and trees blooming and the beautiful sunsets we get here make me so happy. Nature truly has a therapeutic effect!
 Tuesday, April 19, 2011
Unconventional Garden Hose Storage
 We all probably have the good old hose reel's that store our hoses. This is a picture of the one in the front yard. We also had one in the back yard until I had a brilliant idea.
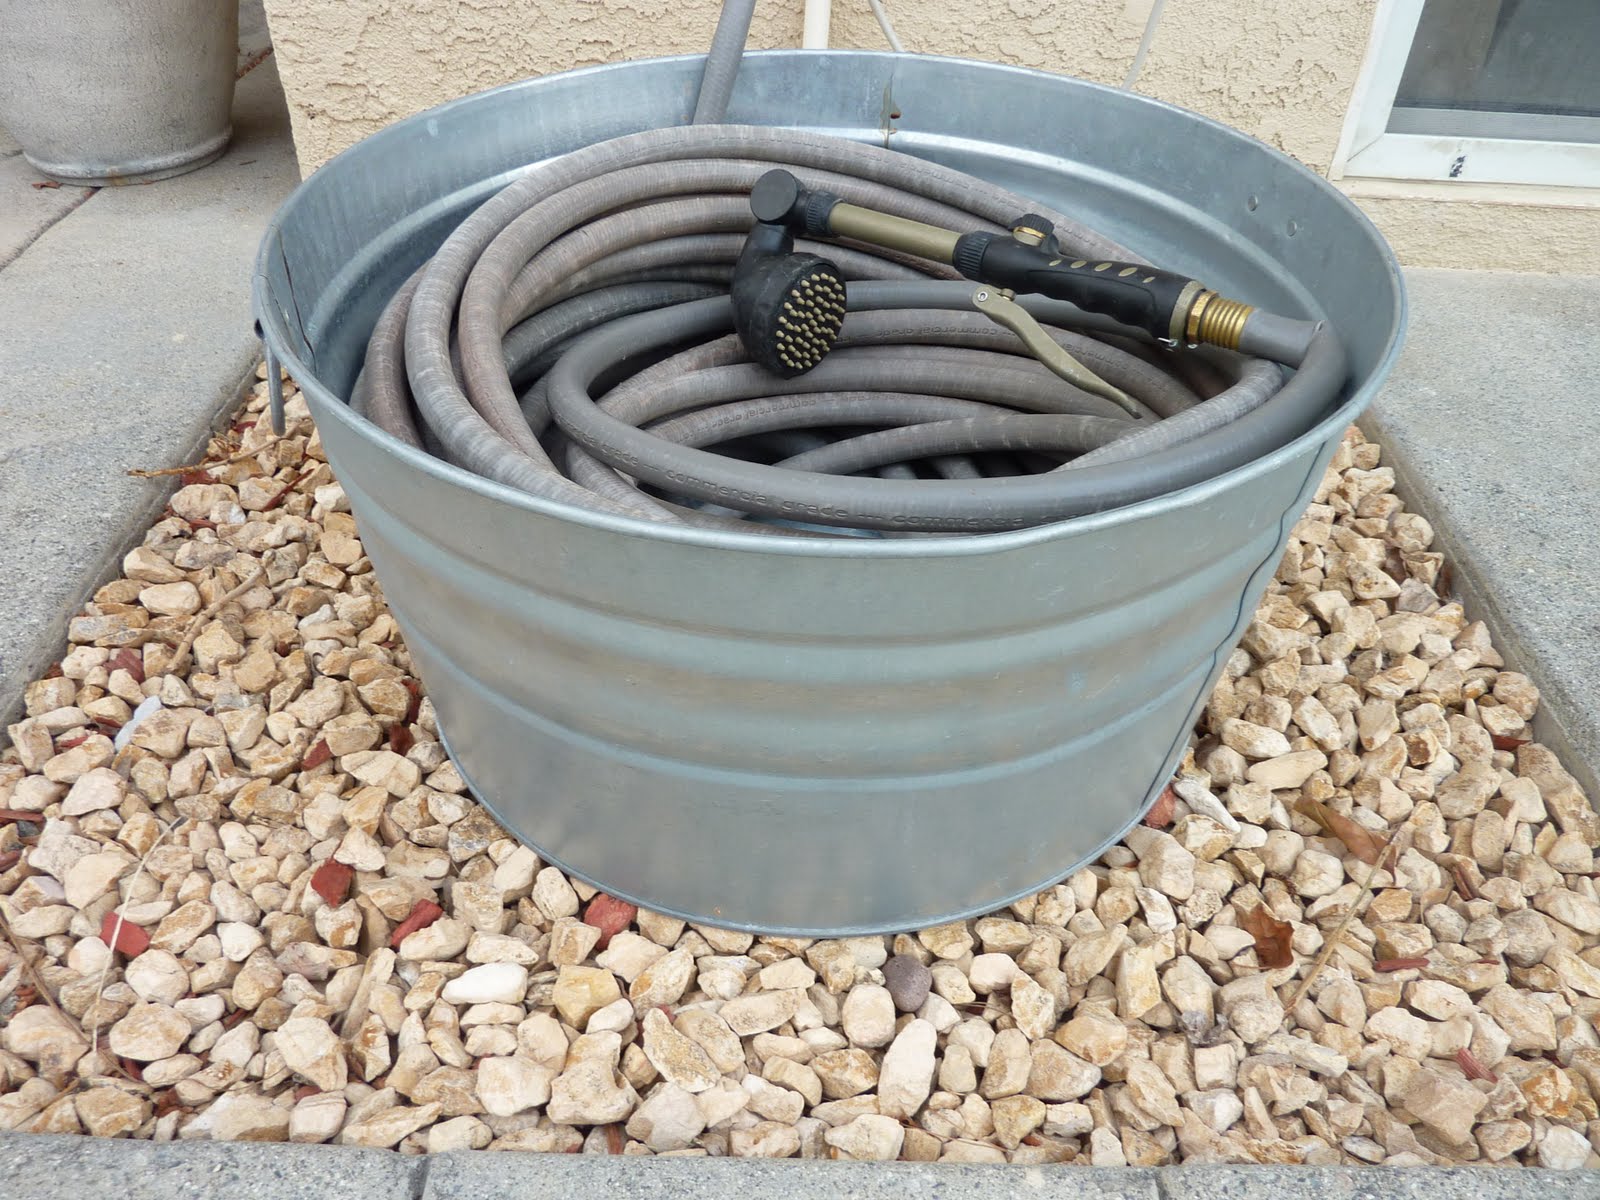 I had a 15 gallon galvanized bucket that was being unused so I decided to try it out. I love the look of galvanized buckets and I figured it would give a casual rustic look to the good old hose. Our backyard hose is 100 feet long since we have such a wide backyard, and it drove me crazy trying to "reel" back in the hose without it getting jammed, not working right...etc etc.
 I love it! It's definitely a time saver! Even my husband admits that it was a good idea now :)
Tuesday, March 29, 2011
Cheap Vinyl Lettering Source

First off, I must preface this by saying I am a really nice person. Our door is always open to friends and family and my husband and I are very much like the "take your shoes off and prop them on the coffee table" type house. One of my big motto's in life is to treat your family like your friends and your friends like family. But door to door solicitors? I'm not a jerk or rude, but I have hit my limit.
Enough is enough. So"what part of no soliciting do they not understand??" I had a no soliciting sign that was in black vinyl lettering on my door, but since my door is a deeper blue I don't think the salespeople were seeing it. Or maybe they did but didn't care. But as I think of it several have admitted seeing it - but then said it didn't "apply" to them because they were not trying to "sell" me anything. I love the "we're not trying to sell you anything" line. If you're not then why are you on my doorstep?
My concern has been how bold solicitors have been lately. My husband and I were working in our garage and a salesperson entered our garage to get our attention. Another noticed that I was working in the garden because the side gate was open. So the 2 of them marched right up to it and started calling me to come over. In my opinion that's crossing the line. And of course neither of them were trying to "sell" me anything.
My other concern is that I am a stay at home mom and I have no idea who is at the other side of the door. Sometimes my kids run and get the door before I get there thinking its one of their friends, and lo and behold its another salesperson. I don't want to open my door to a complete stranger!
I heard about Say Anything Expressions from a popular blogger and I marked it in my favorites bar. I love how you can customize a saying and they can create it for you. She charges $4.50 per foot and 25 cents for each additional inch. The best thing? That includes lettering up to 5 inches tall! And for a 6x9 envelope she only charges $1.50 for shipping. I've seen other vinyl lettering sources that seemed like a good deal but then turned around and charged 8 dollars or more for the shipping which didn't make it a good deal after all.
I scoured the internet for "no soliciting" type sayings, but something that was a little more blunt. Personally my favorite is "We shoot every third solicitor and the second one just left." But I figured that was a little too much and I didn't want anyone walking by to see that from the street and wonder who the heck lived at our house. I decided on No Soliciting. Period. I emailed Say Anything Expressions, and in a few days I had my custom saying delivered to me. It was really easy to apply, and the vinyl is really good quality.
I just put it on the door this evening. Hopefully from here on out the salespeople will leave me alone!
Tuesday, March 22, 2011
Conquering the Clutter
 Since its spring I thought I'd show you what I have been up to the past couple of months. Downsizing. Serious downsizing. Do I need to? No, but if I'm not using it, why store it? I remember when we went through all of our baby items that we donated or gave away to friends. We aren't having any more kids, so instead of sitting in our garage why not let it bless others? I was really surprised as we took that last truckful of donations how I felt an emotional burden lifted off of my shoulders that I didn't even realize that I was carrying! I felt like I had lost 10 pounds just looking at the garage!
I wrote about purging and the 40 trash bags in 40 days challenge in September. You can read that post again here. Sarah at Clover Lane is doing it again this year.
As I look at those empty buckets, I feel such gratitute to see them empty. The items in those boxes are blessing someone somewhere.
The Nester blogged some great thoughts on all of this. In this link she talks about the finding a good deal syndrome. In this link she puts her final thoughts on it.
Sunday, March 13, 2011
Super Easy Whole Wheat Bread
 I absolutely love homeade bread, but I don't do long complicated recipes. This one is the easiest I have ever seen, and it tastes great.
Whole Wheat Bread
6 cups warm water
1/3 cup vital wheat gluten
1/3 cup oil
1/3 cup honey
4 tsp salt
2 Tbsp yeast
around 8-10 cups whole wheat flour
If you have a standing mixer like a Bosch or Kitchenaid, pour in the warm water. Add the yeast next. Continue with gluten, oil, honey, and salt. Add flour until it doesn't stick on the bowl. Continue on medium speed for 7 minutes. (You can also knead by hand if you do not have a mixer)
Let rise for 30 minutes (I just put it in my oven at 170 degrees), then turn the heat up to 350 degrees and cook for 30 minutes more.
That's it! I typically put in a cup or two of white flour as well as whole wheat, but I've done it both ways. This is very moist and definitely not a "glorified hard rock" as some loaves do. I prefer white wheat flour to hard red wheat as it has a lighter texture.
Friday, February 25, 2011
More Trash to Treasure from the Curb
 Well, I just got back from spending a week in San Diego during my kids spring break visiting family. Between that, figuring out my taxes (UGH!). I also finished the bookcase for my boys room - now if only my camera would cooperate and stop taking grainy photos! I think I need to change the ISO.
On with the post, I was driving on one of the highways near my home when I spotted this bookcase as well as two taller ones on the side of the road in front of a locally owned printing shop. I went inside to make sure they were free (which they were) and then proceeded to load it into my minivan BY MYSELF. People driving by must of thought I was crazy.
I had told my oldest son that I would build him a bookcase next that was extra deep in order to hold more of his larger lego creations. I figured that I would put this free one in his room as sort of a prototype to see if it would work out before building him one. But its been a hit so I think I'm going to put that project on the backburner and whip out another bookcase for the living room since he doesn't mind at all having a free bookcase in his room. You see the airplane on the top right shelf - that gives you an idea of how deep it goes!
Wednesday, February 9, 2011
CSN Giveaway Winner

Thanks for all your comments on this giveaway! And congratulations to comment #10, the Domestic Diva! I'll be getting in touch with you!
Friday, February 4, 2011
Surprise Giveaway from CSN Stores
I'm really excited to be hosting my first giveaway! CSN Stores marketing team contacted me and is offering a gift certificate to one of you lucky readers! Never heard of CSN? They have over 200 online stores where you can find everything from kids' swing sets to stylish furniture to cute cookware and more!
One lucky reader will receive a $15 gift certificate to any CSN store to purchase anything they would like! Here are a few things you need to know before you enter:
One lucky reader will receive a $15 gift certificate to any CSN store to purchase anything they would like! Here are a few things you need to know before you enter:
- Must live in the US or Canada. (CSN ships to those countries.)
- Does not cover any shipping costs but you can use it on ANY product at ANY one of their sites.
- You can gain an extra entry by leaving an additional comment on what you would love to have from the site listed above.
- Ends on Tuesday the 8th at midnight PST.
- I'll announce a winner on Wednesday the 9th and will use Random.org to pick the winning entry.
Enjoy!
Thursday, February 3, 2011
Birthday Freebies
The popular website Frugal Girls did a great post on birthday freebies with the links to sign up. All the places are in alphabetical order and there is seriously a lot of places, 50+! Don't forget to sign up your spouse and kids too!
Spray Painting: Upright Freezer
 I got this full upright freezer off of craigslist for 60 bucks, plus they brought it to our house 30 miles away for only 25 dollars, so 85 total. We had a chest freezer that we had outgrown since we have 3 growing boys (plus you never know what is on the bottom of the freezers without emptying the whole thing out) We sold it for 75 dollars via craigslist, so all in all this exchange came out to us being out of pocket 10 dollars. Sound too good to be true? Well, lets take a look INSIDE this lovely freezer.
 It needed a good scrubbing, plus there were spots that the finish had been chipped off and rusted in its place.
  Here is a closer look at what I am talking about. Lots of rust.
 And the paint chipping on the bottom.
 Spray paint to the rescue of course! Here's a before of one of the grills...
 And here it is after. Looks like new again! I had some white gloss paint in my spray paint stash, so I used it, it definitely needed to be glossy so it would clean easily in the future.
 And here is where the paint was chipping off big time. Looks WAY better.
 And here is the fridge after. It seriously looked almost brand new again.
 Another reason I LOVE spray paint.
 And the bottom looks so much better! That was seriously gross the way it looked before. Spray paint to the rescue again! (And a really good scrubbin beforehand)
 And the bottom looks so much better! That was seriously gross the way it looked before. Spray paint to the rescue again! (And a really good scrubbin beforehand)
Friday, January 21, 2011
Organizing Ribbon Storage
This is my before photo of my ribbon storage. Not really working.  I got a great idea from Simple Mom's blog to use a paper towel holder for ribbon storage. I can't find the link so here is one from Real Simple.
 I got a great idea from Simple Mom's blog to use a paper towel holder for ribbon storage. I can't find the link so here is one from Real Simple.
 I realized that unfortunately that wouldn't work for me personally because most of my ribbon is not on the individual spindles like when they were bought. So I decided that sandwich ziploc bags would work instead to keep all the ribbon separate. This is a plastic case that is meant to hold 12x12 scrapbook paper that has been holding a variety of craft essentials the last few years.
 With the lid shut its much better to see each individual ribbon instead of one big tangled mess. Much better indeed.
Confessions of a Spray-Paint-A-Holic
I love spray paint. That is no secret around here. But I wonder if I crossed the line when the first two words are....Princess House. I received a set of Princess House plates complete with a serving platter and dish, bowls, and a pitcher. A family member was moving across the country and gave them to me as she was radically downsizing her house.  Since space is at a premium in my kitchen, I really make sure that I only have things that I use. This large bowl was sitting in the back of the cabinet and if I was going to keep it around I wanted to make some good use of it. It's definitely a pretty pattern, but I knew I would use it a lot more if it was solid white as a decor dish. So I did just that.
 I used Kilz spray primer - it took two coats for the pattern to fully disappear. I had a can of almond appliance epoxy spray paint laying around so I decided to use that since it would give it a really hard finish.
 And here is the completed bowl! I love the change.
 And here it is sitting complete with its current inhabitants - more yarn balls. I've been doing different colors and I've been throwing them in there as I finish them. I am loving that turquoise color, I'll definitely be making more of those! I'm definitely looking forward to spring colors coming soon!
 Since space is at a premium in my kitchen, I really make sure that I only have things that I use. This large bowl was sitting in the back of the cabinet and if I was going to keep it around I wanted to make some good use of it. It's definitely a pretty pattern, but I knew I would use it a lot more if it was solid white as a decor dish. So I did just that.
 I used Kilz spray primer - it took two coats for the pattern to fully disappear. I had a can of almond appliance epoxy spray paint laying around so I decided to use that since it would give it a really hard finish.
 And here is the completed bowl! I love the change.
 And here it is sitting complete with its current inhabitants - more yarn balls. I've been doing different colors and I've been throwing them in there as I finish them. I am loving that turquoise color, I'll definitely be making more of those! I'm definitely looking forward to spring colors coming soon!
 Monday, January 17, 2011
Bathroom Vanity Mini-Makeover
 I think a lot of us who either own or rent have bathroom vanities that look like this. Our home was built in 1992, and we bought it in 2007. So previous owners/tenants can make a mess inside, and you really don't know what was in there beforehand. Even if you're a renter this is something you could do without it being a permanent change and having to ask your landlord for permission.
 This is our guest bathroom. It is literally the size of a closet. The width of the vanity? That's how wide the room is - the tiles are 12x12 so you can see its quite a small space. It's perfect for guests because its always clean as our family uses the other two full bathrooms in the house. Now I probably could of gone to the store and picked out some contact paper or something to the like but I wanted to see if I could pull it off without having to spend anything and just shop my own house.
 I wanted the floor of the vanity covered up because of the various water stains and such that have happened over the last 18 years. I took an old towel I had and measured out what the dimensions were and cut accordingly.
 Then I grabbed my stapler gun and started stapling the towel down on all 4 sides. It looked unfinished/raw with the staples showing through that I went into my ribbon box and found some ribbon to make it look more finished.
 Much better. I also stapled the ribbon as well but since the ribbon is patterned the staples blend right in.
 The main reason for this little mini-makeover was that I wanted a place to put towels, toiletries, and the like for guests in all one place so that when we have friends and family stay, they have the things they need at their fingertips and don't have to feel awkward looking through our cabinets for a clean towel, toothpaste, ect. This is what I included: Towels, washcloths, travel sized shampoo, conditioner, toothpaste, lotion, soap, facial cleaner, chapstick, his and hers razors, shaving cream, baby powder, dental floss, a few toothbrushes, and most definitely feminine hygiene products. I know how embarrassing it can be to ask your host for a pad or tampon when the lovely "time of the month" comes. I also had an extra blowdryer, curling iron, and flat iron that I rarely use so I put those in there as well.
 I had this small white plastic bucket that was being unused and it fit all the loot perfectly! I did not go out and buy any of this stuff separately, they were all things around the house that I corralled. The travel sized shampoo, conditioner, and lotion were from hotels that we had previously visited. I grabbed a metal tin that I wasn't using that I had previously spray painted and put the blowdryer and curling irons in it.
 And here is my completed guest bathroom vanity! I can put those white towels on a clean surface finally!
Friday, January 14, 2011
Yarn Ball Tutorial
 How to make yarn balls. I love these things-and no they are not cat toys they are for decor :) They are really simple to make - I think one of the reasons that I love yarn so much is that it reminds me of my Grandma who crochets loads of blankets, potholders, ect. Can I crochet? I've tried it several times over the years, but I'm too much of a perfectionist when it comes to making uniform loops to truly enjoy it plus it takes a long time! I definitely admire those of you that can crochet!
  I start with these foam balls that I got at a local dollar store, then my yarn of choice and some tape. (I used packing tape because that's what I had around). I've also used a tennis ball and it worked great as well - you can get those typically in a 3 pack at the dollar store too.
 Although you can barely see it, I stuck a piece of tape over the beginning of the yarn to hold it in place. It'll be covered so it really doesn't matter what tape you use, just that it can hold the yarn in place for a bit.
 Start wrapping yarn all over the ball. There really is no right or wrong way to wrap. Then when I finish wrapping the ball I tie a knot in the end and tuck it under some of the yarn strands. That's it! This is also the same way that I made my yarn balls that I stuck on my headboard (which are still there cause I love them so much.) You can read that post here.
Subscribe to:
Posts (Atom)